And if you missed Week 1 - The Basics, you can find that here.
If you are looking to purchase the book I use for this course, you can find it used and fairly inexpensive here. There may be some new or hardcover, but I generally use spiral bound.
Alright, now that we have all the links out of the way, let's get started on Week 2.
Personally, I think the hardest week is Week 1. You're trying to learn names, gauge where each student is, and refresh (or teach for the first time) the most basic principles of Excel.
Week 2 always begins with a review on the Basics. I will usually point to a button, ask the class collectively what it is called and what its function is. Normally, most remember. But I ALWAYS like to review. Behind my back, I'm sure my students call me the "Review Queen".
Here's my thing on review: they're not going to be completely honest when I ask who remembers. They don't want to look weak or forgetful in front of their peers. I. Totally. Get. It.
So, instead of embarrassing anyone, I just assume at least one person needs to review each button. Each class begins with a 5-10 minute review of the previous class. Surprisingly, no one ever rolls their eyes at me. Then again, I have many years of teaching ahead of me.
OK that's my blurb on review.
Week 2.
Also known as: the week that people start to catch on.
Here's what I like to cover the second week with my students:
1. How to select a range.
You'd be surprised how many people have a problem selecting a range. SO before we select a range, it's always important to understand what a range is and how it appears in the program.
A range is a selected string of cells that you want to make changes to.
For example: If I was told to select the range A1 to B10, I would have to understand that cells A1 through A10 have to be highlighted as well as B1 through B10. But instead of listing off every cell, we would simply write the range as follows:
A1:B10
This is how Excel reads a range. So, it's best to teach your students as soon as possible that this is what a range looks like, this is how it will appear in formulas and this is how the program reads that 20 cells are in a range together.
The first and last cell are separated by a colon to express that all cells between A1 and B10 must be highlighted.
So, let's highlight!
There are TWO common ways to highlight.
The first is to click on cell A1 to select it. Once it is clicked on and selected, hold down the SHIFT key on your keyboard and click on B10. All cells between will be highlighted.
 |
| A1 is selected because there is a dark black border around it. |
 |
| All 20 cells are now highlighted in the range. |
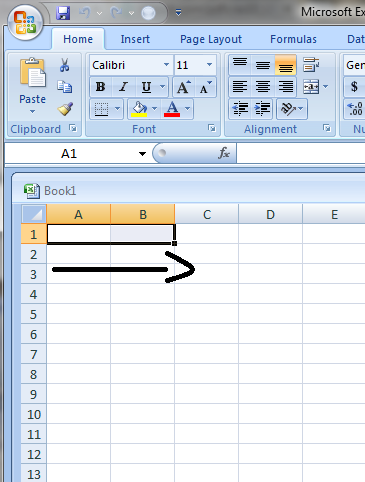
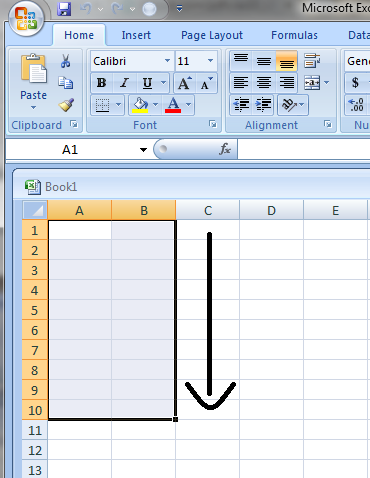
The second way to highlight a range is to select cell A1 by clicking on it and then holding down the left side of your mouse. While holding down the mouse, slide the mouse across A1 to B1 and then down to B10.
 |
| Holding down the left side of your mouse, drag your mouse to the right. |
 |
| Without letting go of the left side of the mouse, drag your mouse down through B1 to B10. |
After ranges, I like to transition into something simple. So, we cover Undo and Redo next.
I have the students write their names in A1. And then press the Undo Button in the top left corner by the Office Button.
Then, I have the students click on Redo, which is the right of Undo.
Their name reappears.
And they learn that it's OK to make mistakes in Excel because they can be easily fixed.
We end the class with EVERY SINGLE ONE OF MY STUDENTS least favorite topic: Cut, Copy and Paste.
Ah...the three little words that cause so much frustration in some very capable, smart people. I have taught Cut, Copy and Paste in EVERY class I've ever had. And people still struggle with it. So, I make a "cheat" sheet and hand it out. It usually looks something like this:
The Clipboard: There is an imaginary clipboard in your computer. When you cut or copy, the information you have highlighted will automatically be clipped onto your imaginary clipboard until you tell the computer where it must be moved next. The computer will only store the information as long as you DO NOT cut or copy anything else.
CUT: Cut will completely remove text or numbers from your document. It will be placed to the Clipboard and you will not be able to see it. You use Cut when you want to remove text from one area and place it in another.
COPY: Copy will leave your original text where it was originally typed AND place it somewhere else so you will have the text in TWO places. You use Copy when you want to just "copy" text and place it in another area.
PASTE: Regardless of whether or not you Cut or Copy, you will have to Paste. Paste will put your text where you tell it to.
REMEMBER: Cut removes, Copy keeps.
If you have any questions, please leave them in the comments below!
Happy Teaching!
Jessica
Looking for Teacher Resources? Check out MY STORE for all the books I use in the classroom.


No comments:
Post a Comment