Friday, January 9, 2015

Beginning Excel - Week 5: Charts!


If you haven't checked out my syllabus for my 5-week Beginning Excel class, you can find it here

If you missed Week 1 - The Basics, you can find that here.

If you missed Week 2 - The Worksheet, you can find it here.

If you missed Week 3 - Formulas, you can find it here.

If you missed Week 4 - Formatting, you can find it here.

If you are looking to purchase the book I use for this course, you can find it used and fairly inexpensive here. There may be some new or hardcover, but I generally use spiral bound.

Charts are fun! And my students always enjoy doing Charts on the last day of our 5-week course.

Charting is easy when you have a plan. Normally, I have my students track sales. Most of them enter my class with a general understanding of how businesses operate. So, we track sales.

Most of my charts look a little something like this:


I have my students put these into their worksheet. And then the real FUN begins. 

The Charts icon is located at the Insert tab. 


A chart will then appear. You will most likely have to readjust the chart. This is a great exercise to help your students learn the odds and ends of formatting charts. 

Before: 


After:


I try to cover as much as I can when dealing with charts in a 2-hour period. Sometimes we get through a lot; sometimes we get stuck on little things. Whatever the case, my students always walk away able to make a chart using data from a select group of data. 

And when their future job requirements include Excel presentations with fancy graphs, they will be successful.

If you have any questions, please feel free to leave them in the comments.

Looking for a book to teach your Beginning Excel class? Check out MY STORE for all Excel books used to develop my lesson plans.

Happy Teaching! 
Jessica

Beginning Excel Week 4 - Formatting


If you haven't checked out my syllabus for my 5-week Beginning Excel class, you can find it here

If you missed Week 1 - The Basics, you can find that here.

If you missed Week 2 - The Worksheet, you can find it here.

If you missed Week 3 - Formulas, you can find it here.

If you are looking to purchase the book I use for this course, you can find it used and fairly inexpensive here. There may be some new or hardcover, but I generally use spiral bound.


If you have made it to week 4, you're doing GREAT!

Because it's all pretty simple here on out.

I always make sure to have an 'easy' class after a hard one. And after you spend 2 hours trying to learn how to do Formulas, it's always good to learn something a little easier the next class. That's what my students tell me anyway.

So...we start working on formatting in Week 4.

Ah, the art of formatting cells. They're always fun, aren't they?

The easiest way to teach this is to have fun with it. I'm serious! Fun should always be a component of learning. If your students aren't having fun, it might be time to change that.

Fun always begins with you, the instructor. If you don't foster a safe, fun environment, they'll have a difficult time learning.

The best way to foster an environment of fun is to keep things light. Don't get frustrated. We all learn at different speeds. We all have different stories and backgrounds. Share who you are and add your own twist of fun to whatever you're teaching.

Formatting is easy when you have something you want your students to copy. So, I usually make a grocery list or roster for them to format. Today, I'll use a roster.


You can have them copy this roster onto their own worksheet. Once they have it copied, you can have them begin formatting the roster.

This is a good opportunity to refresh Font, Font Size, Bold, Italicize, Alignment, Borders, Colors, and Merge & Center.

I always begin with "Class Roster". Have them bold, italicize, color, or change the font and font size. Add in borders and merge the header. Be creative. 

When they're done, hopefully it looks a little something like this. 


Each students will look different, but the point is to create a roster that they will like. Encourage use of colors, fonts and alignment changes. 

My students spend lots of time playing around with all the buttons. This is also a great exercise to help them become more familiar with the Home tab.

When they are finished, ask them to make suggestions for lists to format. Or ask them to make their own. 

I have my students print theirs out. This is also a great lesson to teach printing worksheets. You can cover printing in landscape as well. 

As you can tell, a lot of my teaching is off the cuff. I'm flexible. 

Make a list of things you want to cover this class like format, printing and merge & center, and cross them off as you come to them. You may get to all of them or none of them. I have learned that teaching is a fine art and often crosses a thin line between preparation and chaos. 

Don't stress; remember last week was exhausting with Formulas. It pays to give your students a down week. 

This is also a good week to do a short review of EVERYTHING you have covered. All three weeks that led up to week four. 

As always, if you have any questions, leave them in the comments below.

Interested in buying the book I use for this class? Check out MY STORE to buy Labyrinth Learning's Microsoft Excel 2010: Level 1. 

Happy Teaching!
Jessica

Tuesday, January 6, 2015

How To Remove An Item From the Recycle Bin


Delete.

It happens often.

You don't need use of something.

OR

Sometimes, you've realized you've deleted something you weren't supposed to.

What do you do then?

Well, the good news is that everything you delete goes into your Recycle Bin. It can be recovered.

Here's how:

1. Double-click on the Recycle Bin icon your desktop. A new window will open containing all deleted files.


2. Locate the file and select it. It will highlight blue after you click on it.


3. Click on the Restore this item option at the top of the screen. This will restore the item to its previous location before deletion. In my case, it will appear again on my desktop.


If you have any questions, leave them in the comments below.

In search of computer textbooks for your class? Check out MY STORE to look through the books I use for all of my classes. 

Happy Teaching!
Jessica


Monday, January 5, 2015

Beginning Excel Week 3 - Formulas


If you haven't checked out my syllabus for my 5-week Beginning Excel class, you can find it here


If you missed Week 1 - The Basics, you can find that here.

If you missed Week 2 - The Worksheet, you can find it here.

If you are looking to purchase the book I use for this course, you can find it used and fairly inexpensive here. There may be some new or hardcover, but I generally use spiral bound.


In my experience, formulas are hard for students to catch on to. They seem to struggle with the basics, so I devote an entire 2-hour period to formulas. And practicing them.

I start by having my students work up a monthly budget. They must put in titles, bold expenses, and add in all miscellaneous spending. If I have a more advanced class, I will ask them to color code certain things. Bills get color coded one color; expenses another.

Once they have their budgets sorted out, I begin by asking them to add up all their expenses and bills. Then, they are asked to put the amount below.


They begin by adding the old-fashioned way. Then, I introduce the SUM formula. The easiest way to do this is to put it up on the projector if you have one. If not, you can use a white board or poster board if a projector is not available. 

You will want to add together the Bill and Expense Totals. Your cells may differ, but you they should

=SUM(B7+B13)

The formula is as follow:

You must ALWAYS put an = at the beginning of your formula. This is how Excel recognizes that you are typing in a formula. 

Then, you must add SUM after the =. This will tell Excel you are adding 2 or more cells together.

A parentheses should enclose the cells you are going to add together. You can put them in one at a time and separate them with a +.

I have them enter this formula next to the total they added up on their own. 


Then, I ask them to find the totals added up by Bill and Expense. However, I introduce the range formula. If you are grouping together, you can use the : to save time.

=SUM(B2:B6)
=SUM(B10:B12)


I like to tell my students that they have just done it the long way when it comes to a range of cells.  

Note: If you are adding cells that are not near each other, you must use the +. If you are adding cells that are in a range (like B10, B11 and B12) you can use a : to condense.

Then, I teach them the short cut. 

Yes, after all that, there is a short cut!

And you can find it under the Home Ribbon under the Editing tab on the right hand side. 

I deleted the totals under bills and then clicked cell B7. After that, I click on the AutoSum button and a marquee appears around the cells Excel believes you are trying to sum. You can adjust if you need to. 


Click Enter and the new total will appear.

If I have time--and everyone has understood SUM--you can move onto Average, Max and Min. those seem to work well after teaching SUM.

If you have any questions, leave them in the comments below.

Happy Teaching!
Jessica

Saturday, January 3, 2015

Beginning Excel 2010 Week 2 - The Worksheet and the Dreaded Cut, Copy and Paste


If you haven't checked out my syllabus for my 5-week Beginning Excel class, you can find it here


And if you missed Week 1 - The Basics, you can find that here.

If you are looking to purchase the book I use for this course, you can find it used and fairly inexpensive here. There may be some new or hardcover, but I generally use spiral bound.

Alright, now that we have all the links out of the way, let's get started on Week 2. 

Personally, I think the hardest week is Week 1. You're trying to learn names, gauge where each student is, and refresh (or teach for the first time) the most basic principles of Excel.

Week 2 always begins with a review on the Basics. I will usually point to a button, ask the class collectively what it is called and what its function is. Normally, most remember. But I ALWAYS like to review. Behind my back, I'm sure my students call me the "Review Queen". 

Here's my thing on review: they're not going to be completely honest when I ask who remembers. They don't want to look weak or forgetful in front of their peers. I. Totally. Get. It. 

So, instead of embarrassing anyone, I just assume at least one person needs to review each button. Each class begins with a 5-10 minute review of the previous class. Surprisingly, no one ever rolls their eyes at me. Then again, I have many years of teaching ahead of me.

OK that's my blurb on review. 

Week 2. 

Also known as: the week that people start to catch on

Here's what I like to cover the second week with my students:

1. How to select a range. 
You'd be surprised how many people have a problem selecting a range. SO before we select a range, it's always important to understand what a range is and how it appears in the program.

A range is a selected string of cells that you want to make changes to.

 For example: If I was told to select the range A1 to B10, I would have to understand that cells A1 through A10 have to be highlighted as well as B1 through B10. But instead of listing off every cell, we would simply write the range as follows: 

A1:B10

This is how Excel reads a range. So, it's best to teach your students as soon as possible that this is what a range looks like, this is how it will appear in formulas and this is how the program reads that 20 cells are in a range together.

The first and last cell are separated by a colon to express that all cells between A1 and B10 must be highlighted.

So, let's highlight!

There are TWO common ways to highlight.

The first is to click on cell A1 to select it. Once it is clicked on and selected, hold down the SHIFT key on your keyboard and click on B10. All cells between will be highlighted. 

A1 is selected because there is a dark black border around it.

All 20 cells are now highlighted in the range.

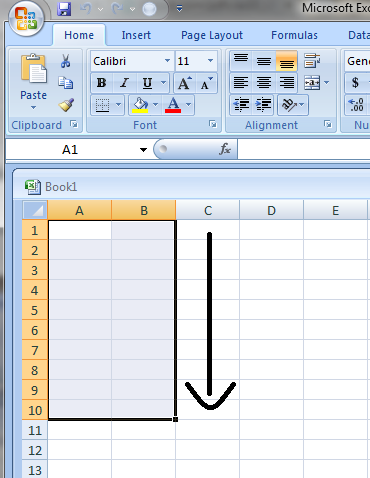
The second way to highlight a range is to select cell A1 by clicking on it and then holding down the left side of your mouse. While holding down the mouse, slide the mouse across A1 to B1 and then down to B10.
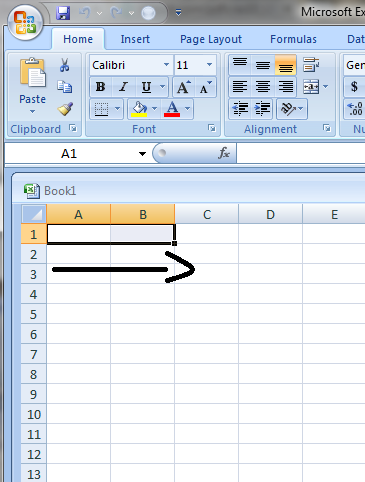
Holding down the left side of your mouse, drag your mouse to the right.

Without letting go of the left side of the mouse, drag your mouse down through B1 to B10.
Now, your range is selected! Phew! Not too hard, right?

After ranges, I like to transition into something simple. So, we cover Undo and Redo next.

I have the students write their names in A1. And then press the Undo Button in the top left corner by the Office Button.


Then, I have the students click on Redo, which is the right of Undo.


Their name reappears. 


And they learn that it's OK to make mistakes in Excel because they can be easily fixed.

We end the class with EVERY SINGLE ONE OF MY STUDENTS least favorite topic: Cut, Copy and Paste.

Ah...the three little words that cause so much frustration in some very capable, smart people. I have taught Cut, Copy and Paste in EVERY class I've ever had. And people still struggle with it. So, I make a "cheat" sheet and hand it out. It usually looks something like this:


The Clipboard: There is an imaginary clipboard in your computer. When you cut or copy, the information you have highlighted will automatically be clipped onto your imaginary clipboard until you tell the computer where it must be moved next. The computer will only store the information as long as you DO NOT cut or copy anything else.

CUT: Cut will completely remove text or numbers from your document. It will be placed to the Clipboard and you will not be able to see it. You use Cut when you want to remove text from one area and place it in another.

COPY: Copy will leave your original text where it was originally typed AND place it somewhere else so you will have the text in TWO places. You use Copy when you want to just "copy" text and place it in another area.

PASTE: Regardless of whether or not you Cut or Copy, you will have to Paste. Paste will put your text where you tell it to. 

REMEMBER: Cut removes, Copy keeps.

If you have any questions, please leave them in the comments below!

Happy Teaching!
Jessica

Looking for Teacher Resources? Check out MY STORE for all the books I use in the classroom. 

Friday, January 2, 2015

How To Create A Folder On the Desktop


There are many reasons you may find yourself trying to create a folder. To save work. To save documents. To save pictures.

Whatever reasons you find yourself in need of a folder on your desktop, here are some really easy, quick steps to creating a folder.

1. Right-click on a blank space on your desktop. Where you right-click is where the folder will appear so make sure nothing else is there.

A menu will then appear.


2. After the menu appears, place your mouse on New, which is about 2/3 of the way down the menu. Slide your mouse horizontally across the New bar until another menu pops up. Select Folder, which is the first option at the top of the second menu.
Note: You must keep your mouse on either menu or it will close out the second menu. Do your best to keep your mouse in the New bar until you reach the second menu.


3. A folder will appear where you originally right-clicked on your desktop. You will notice that New folder is highlighted in BLUE. This means that you can begin typing to name the folder. If you click somewhere on your desktop before typing, the folder will be named New folder.


4. To rename the folder, place your mouse on the folder and simply right-click. A menu will appear again and click on Rename, which is the second to last option. Your text will highlight BLUE and you can begin typing in what you would like to name the folder. When you are finished typing, hit the Enter key on your keyboard.


As always, if you have any questions, leave them in the comment section below.

Happy Teaching!
Jessica

Thursday, January 1, 2015

Beginning Excel 2010 Week 1 - The Basics


Ah...the basics. Where do we begin?

Well, I always start at the very beginning.

How do we locate and open the program?

Start by clicking on the Start button. If Excel does not appear on the list of pinned programs, click on the All Programs button at the bottom of the window.


After the All Programs button is clicked, a list of all the programs stored in your computer will appear. Scroll down to the list until you find Microsoft Office folder. Click on it once. A list of programs stored within the folder will appear. Choose Microsoft Excel 2010.


The program will open to a blank workbook with a blank worksheet displayed. This is the best time to go over Columns and Rows. It's also where I introduce cells and their names.

The Home tab will appear at the top and this is where I begin next. All of your students will be at different levels, but it's never a bad idea to refresh the memories of those who already know how to use the program. It's good for everyone to be on the same page.


Normally, I begin with the Font and Alignment tabs. Most people are familiar with these tabs even if they have only had minimal experience with Microsoft Office. I spend a lot of time here with them. If they can't understand how the basics work, they'll have a hard time moving onto Pivot Tables and Macros. 

After we go over each button, I ask them to create a small weekly budget. They must list all the things they have to pay for the next week in Column A and their corresponding amounts in Column B.


The reasoning behind asking them to make a simple budget is so they can start learning how to enter data into cells. I also take this time to teach them a really easy trick if your words run over into another cell. 
Place your mouse between the column the word is written in and the column the word spills over into. A black + will appear. Double-click and watch as the column resizes itself. 

It's at this point that I also teach them how to use Merge & Center and teach them how to Save the document. If you are using public computers, I find it easiest to have them save their Excel workbook to the Desktop in a folder marked with their name or Excel Level 1. 

If you are using Labyrinth Learning's Microsoft Excel Level 1 book, you can have them to work on Lesson 1: Reinforce Your Skills page 27 problems 1.1 and 1.2.

To see my syllabus for Beginning Excel, you can find it here

If you have any questions, leave them in the comments below.

Happy Teacher,
Jessica